
Ransomware Elastic Security Experiment
In this article I will discuss deploying Demonware Ransomware made with RAASNet on my homelab setup. I will be targeting a Windows 10 host with Windows Defender and the Elastic Security Agent installed.
In this purple team experiment, I will look into the execution, exfiltration, and impact phases of the MITRE ATT&CK Framework. This is to analyze how ransomware executes on a host in order to inspect alerts received at the SIEM and the mitigations in place due to the Elastic EDR and Windows Defender. The purpose and scope of this experiment are important to discuss, as this will be a staged attack not involving initial access, defense evasion, or privilege escalation. These will be assumed for the purpose of this experiment.
During a real attack, an attacker would likely have an initial staging script to do things like disabling antivirus solutions and downloading the malicious payload. This could be included as part of a phishing campaign or as a trojan.
Launching RAASNet:
In order to execute ransomware, we must first build some ransomware!
Ransomware typically involves mass killing of processes, exfiltration of data, deleting of backup files, encrypting data for impact, and communicating with a C2 server for key exchanges. This is a lot of code to write and impractical for modern threat actors. Nowadays, threat actors use RAAS or Ransomware As A Service. These RAAS groups make ransomware generators, or software that builds out other malicious software.
Today, I’ll be using the open-source Ransomware generator RAASNet, created for training purposes. The github pages can be found below, although it is frequently taken down or moved:
https://github.com/Toyhack/RAASNet
After following installation instructions (I had to modify my numpy version to the latest) I was greeted with a logon page. I was unable to login, and did not attempt to make an account. Instead I opened the RAASNet.py python file in sublime. This logon method makes an http post request to hxxps[:]//zenzo[.]nl which does not appear to resolve anymore.
No matter, simply commenting out all the logic and running the MainWindow method with a supplied “prof” dictionary variable completely bypasses our logon.
def login(self):
        # Check username and password
        check_pwd = hashlib.sha256(self.options['pwd'].get().encode('utf-8')).hexdigest()

        payload = {'user': self.options['username'].get(), 'pwd': check_pwd}

        #r = requests.post('hxxps[:]//zeznzo[.]nl/login[.]py', data=payload)
        if True:#r.status_code == 200:
            if False:#r.text.startswith('[ERROR]'):
                #messagebox.showwarning('ERROR', r.text.split('[ERROR] ')[1])
                return
            # elif r.text.startswith('[OK]'):
            #     data = r.text[13:]
            #     data = data.split('\n')
            #     prof = {}

            #     try:
            #         for i in data:
            #             i = i.split('=')
            #             prof[i[0]] = i[1]
            #     except Exception:
            #         pass
            else:
                prof = {"username":"", "pwd":"", "Email":"", "Name":"", "Surname":"", "Rank":"", "Status":""}

                self.destroy()
                main = MainWindow(self.options['username'].get(), self.options['pwd'].get(), prof['Email'], prof['Name'], prof['Surname'], prof['Rank'], prof['Status'])
                main.mainloop()
        else:
            messagebox.showwarning('ERROR', 'Failed to contact login server!\n%i' % r.status_code)
            return
After “logging in” I was greeted with the RAASNet Ransomware generator/builder.

Building the Payload:
As you can see, this application allows a user to generate a python payload, compile that to an executable, and start a C2 server. Thus most of the heavy lifting is done. I will be starting my C2 server and generating my payload on a Kali Linux box. I will then transfer this payload, compile it on a Windows host with the Elastic Agent and Windows Defender, and run it. The malicious python executable must be compiled on the operating system it is meant to target. I.E. a PE can only be compiled on a Windows machine and an ELF can only be compiled on a Linux machine.
After selecting “GENERATE PAYLOAD” I am met with some configuration options. I will leave most of these as the default, however I will configure the server settings as the IP address of my Kali Linux host and an ephemeral port that I will listen on.
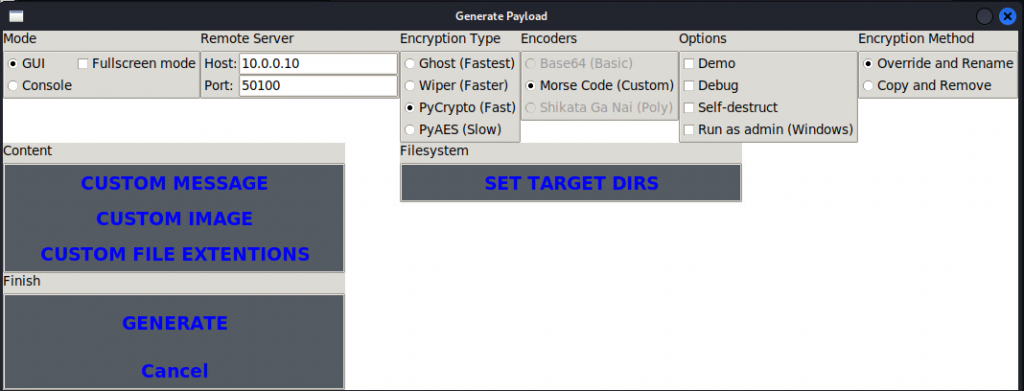
Here we could set a custom message or image. This will be displayed once the files are locked down and the message will be dropped in READMEs in the directories encrypted.
Selecting “Target Dirs” could be useful if a threat actor is targeting an organization with a specific file system discovered during the Reconnaissance phase.
The Encryption Method section is interesting from a forensics perspective. Selecting “Override and Rename” will perform an in-place encryption, while “Copy and Remove” may still leave unencrypted versions of the “deleted” files in non-overwritten entries in the Windows File System. As a threat actor, this is not advantageous and would allow the victim to recover their data without paying my ransom.
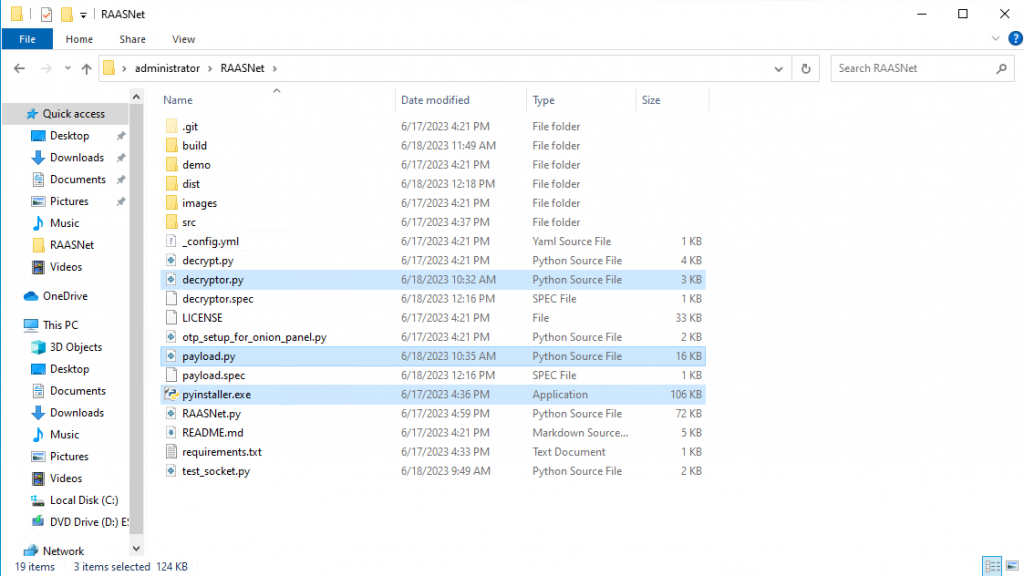
After modifying the appropriate settings, I can select “GENERATE” which will generate payload.py and decryptor.py. Both of these files were moved to my Windows host using PSCP and compiled.
Starting the C2 Server:
This is as simple as selecting “START SERVER”.
This will then start a server on the provided IP and port number that will listen for encryption keys. Keep in mind, this seems very unlikely to actually receive the encryption key. This may be due to payload.exe encrypting itself before sending the encryption key, however, I have not been able to receive an encryption key even after verifying communication between hosts.

After starting the server, I transferred the malicious python files over to my Windows host so I could compile them using pyinstaller.
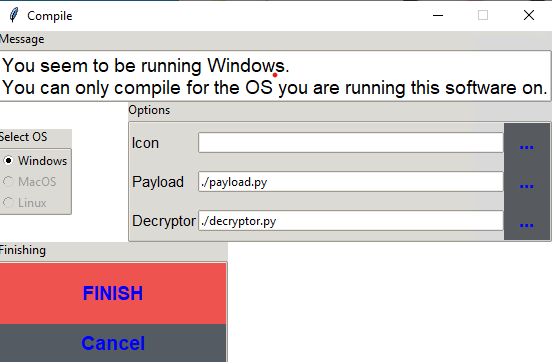
Compiling the Payload:
Compilation should be as simple as moving the malicious python files into the RAASNet directory and selecting “COMPILE PAYLOAD.” However, PyInstaller no longer adds itself to the PATH during installation. My quick fix for this was locating the PyInstaller.exe file and copying it into the RAASNet directory.
After this, I simply selected “COMPILE PAYLOAD” and “FINISH”.
Now, we have payload.exe and decryptor.exe in the /dist/ folder. In this experiment, I am assuming this payload is being executed by the ‘administrator’ user either as part of a phishing campaign or execution of a stager has occurred to privilege escalate. These constraints are important to introduce, due to the next step. Execution.
Executing the Payload:
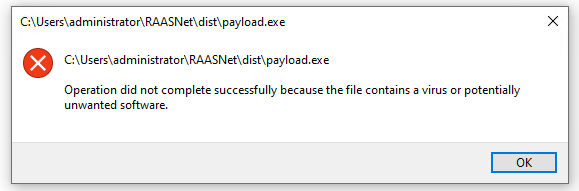
Upon execution of this payload, I was expecting my files to blip for a moment before being replaced with a “.DEMON” extension. To my chagrin as a red teamer, this did not happen. Both Windows Defender and the Elastic Security Agent blocked execution.
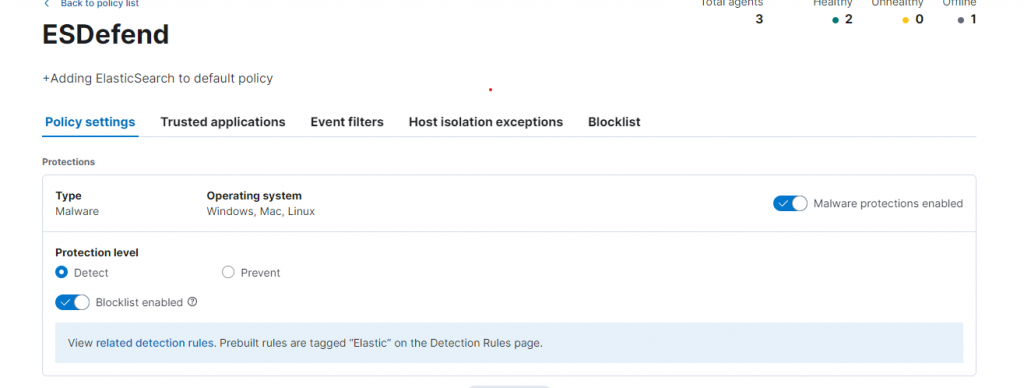
We’ll come back to this in a minute to see how we were notified. For now, let’s cheat a little and disable Microsoft Defender and set the Elastic agent to “Detect” instead of “Prevent.” From the home page, we’ll go to Security -> Manage -> Policies -> ESDefend and select the “Detect” radio button:
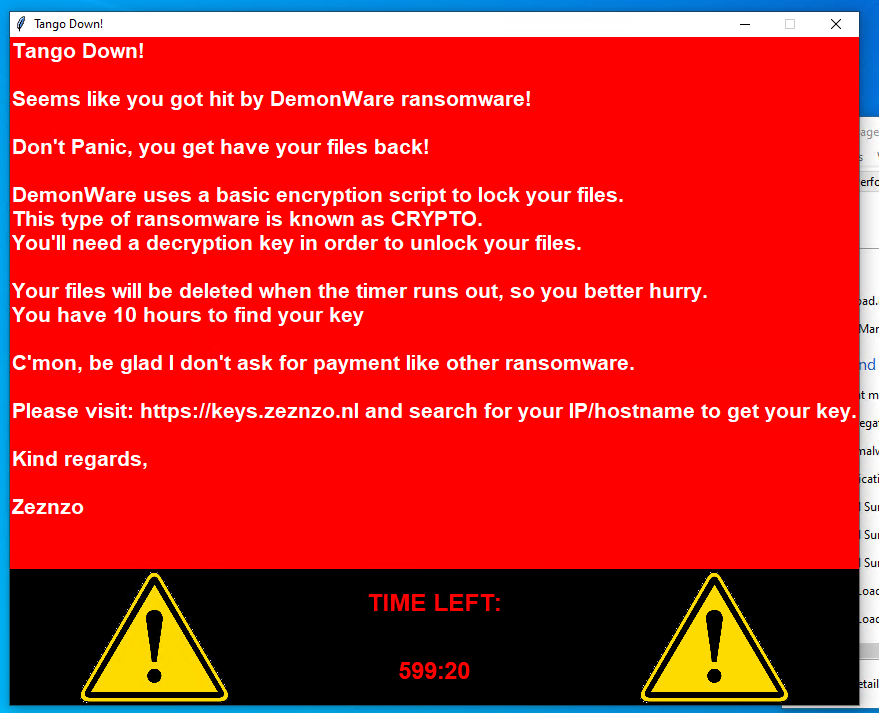
After doing this, and disabling Microsoft Defender through whatever means chosen, we can execute our ransomware! I am using an administrator account, assuming as a supposed threat actor, I had already escalated privileges. Thus, just double clicking on the payload will suffice. After several minutes, my files flash and rearrange and the default ransomware message pops up:
Blue Team Work
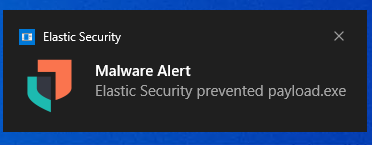
I see this “Malware Prevention Alert” telling me a malicious payload attempted to be executed and was blocked.

Investigating this alert, I can see the hash of the file and a few details about the host. Additionally, I can see the file was prevented from execution. This clearly malicious file shows the inefficiencies of hashing in a blue team investigation.

Using a custom JavaScript applet I built, I can quickly pull relevant details for an escalation to the appropriate party such as an Incident Response team.
https://tool-to-zendesk-parser.s3.us-west-1.amazonaws.com/index.html
Using the tool, I automatically extracted the following details:
Source Hostname: DESKTOP-G1S2LD5
Source IP: 10.0.0.124
Source User: Administrator
Source Domain: ASTRO-STUDIOS
Source OS: Windows 10 Pro
File Name: payload.exe
File Path: C:\Users\administrator\RAASNet\dist\payload.exe
File Hash: a3a25592cb989ad5b0dd5757ca9c48bc379164427516f7f2f98a0dd9818d9b07
Process Name: payload.exe
Process Path: C:\Users\administrator\RAASNet\dist\payload.exe
From here, I may want to further investigate. To do this, I will go to the Discover page under the Analytics tab.
I can use the following queries to check for execution on other hosts:
(process.executable:"C:\\Users\\administrator\\RAASNet\\dist\\payload.exe" or process.hash.sha256:"a3a25592cb989ad5b0dd5757ca9c48bc379164427516f7f2f98a0dd9818d9b07") and not host.name:"DESKTOP-G1S2LD5" This query will search for this process by full file path or hash on any host not already seen. Next, lets take a look at any network activity to ensure no data has been exfiltrated. For this, I will use the following query:
process.executable:"C:\\Users\\administrator\\RAASNet\\dist\\payload.exe" and event.category : "network"Both of these return no results, and this case can be passed off to an Incident Response or Forensics team.